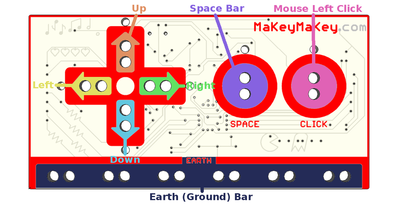
Makey Makey is the brainchild of Jay Silver and Eric Rosenbaum that was launched in 2012. It is a simple circuitry board that connects to a computer through a USB port and allows the user to create their own keyboard and mouse using everyday items. To do this the user connects alligator clips from the board to anything that conducts electricity such as playdough, water, bananas, pizza, carrots, etc. Once everything is plugged in correctly the user can literally control their computer by touching a banana! Seems strange I know, but also highly creative.
Here are a few brief introduction videos to Makey Makey.
Great Video to Introduce Makey Makey to Students:
Ted Talk about why Makey Makey was created. Well worth the watch.
Makey Makey has lots of potential in the classroom and in the media center. The most obvious example is to help expain simple circuits. By using Makey Makey, students learn how connections are made. They also learn what types of things conduct energy. Another way Makey Makey can be used is to help assist with teaching computer coding. Once users become familiar with how it Makey Makey works, student can go online to sites like Scratch.com and create a computer game that utilizes the Makey Makey keys to do new things like make a carrot scream. Perhaps one of the best and easiest ways to use Makey Makey in the library is to add it to a makerspace. Students can get creative with what type of materials can be turned into computer controls. They can also work collaboratively to solve problems that are given to them by the librarian. The Makey Makey website offers lesson ideas and there are many additional websites out there that have lesson plan ideas and best practices in the use of Makey Makey in the classroom or library setting. Below you will find a short list of these websites: - http://makeymakey.com/lessons/ - https://colleengraves.org/maker-ed-lessons-by-resource/ - https://learn.sparkfun.com/tutorials/makey-makey-quickstart-guide/resources-and-going-further - http://educade.org/lesson_plans/use-makey-makey-to-design-a-videogame-controller - https://scratch.mit.edu/studios/1884426/ Each Makey Makey kit comes with a Makey Makey Board, USB Cable, 7 Alligator Clips, 6 Connector Wires, Instructions with Visual Project Start Guide, Online Documentation, and 20 Color Stickers and it only costs $49.95 plus shipping (http://shop.makeymakey.com/). (There are some discounts available to educators, but you have to contact the company by email to find out more information.) The Makey Makey board can control up to eighteen different keys, but to do so you would need more wires and clips which can be purchased separately on the website. Set up is extremely simple. You plug the board into the USB port on any computer. There is no software to install. The computer will recognize the Makey Makey board as long as it is setup correctly. You use the alligator clips to connect the board to the item you wish to turn into a computer key. The user then plugs in a grounding wire to the board and holds the other end. This completes the circuit! The last step is to try out your new controllers using different games or applications on your computer or the web. Here are some websites and videos explaining how to set up your Makey Makey and some creative ideas on what can be done with Makey Makey. How To: - https://www.youtube.com/watch?v=-X3hb__YynM - http://makeymakey.com/how-to/classic/ Creative Ideas: Screaming Carrot - https://www.youtube.com/watch?v=o4iTQ7lr2W0 DIY Operation Game - https://www.youtube.com/watch?v=4KEEqZgFVsg Water Piano - https://www.youtube.com/watch?v=aXFBmunREuQ I hope this brief posting was enough to convince you to try out Makey Makey in your own library. If you already have one or have experience using it, please add your comments. I am sure we would all be grateful for your insights.
I wrote this posting comparing the AASL Standards for the 21st Century Learner to the ISTE Standards for Students. I then realized after posting it that I had compared the wrong set of standards. I was supposed to have compared AASL to the ISTE Standards for Teachers. So I deleted the posting and decided to write a new one. However, I came to an interesting conclusion after examining the ISTE Standards for Teachers. The AASL Standards are designed with the student in mind, not the teacher. How can you really compare teacher standards to student standards? That did not really make sense to me so I decided to repost my original comparison. However to make sure that I get full points for the post, I focus on the ISTE Standards for Teachers at the end of this posting. Original Post: Here we have two different sets of standards. One is for teaching library skills the other is for teaching technology skills. If you were not familiar with the standards, one could assume that one set would be used solely in the library and the other would be used in the computer lab. Upon closer inspection, one will find that the standards are not very different from each other. Both sets of standards have four key areas. They are listed below in a table. 1) Creativity and Innovation (ISTE) 1) Inquire, Think Critically, and Gain Knowledge (AASL) 2) Communication and Collaboration (ISTE) 2) Draw Conclusions, Make Informed Decisions, Apply Knowledge to New Situations, and Create New Knowledge (AASL) 3) Research and Information Fluency (ISTE) 3) Share Knowledge and Participate Ethically and Productively as Members of our Democratic Society (AASL) 4) Critical Thinking, Problem Solving, and Decision Making (ISTE) 4) Pursue Personal and Aesthetic Growth (AASL) When you analyze the standards you can match up ISTE 1 to AASL 4, ISTE 2 to AASL 3, ISTE 3 to AASL 1, and ISTE 4 to AASL 2. So the question on the table is this, if the standards are so closely aligned why should librarians use both sets of standards when creating lessons? To prove the importance of such use, perhaps we should break down the standards and focus on just one comparison. For this blog posting, we will compare ISTE 2 - Communication and Collaboration to AASL 3 - Share Knowledge and Participate Ethically and Productively as Members of our Democratic Society. The two standards, ISTE 2 and AASL 3, are very similar in that both focus on working together with others to collaborate on group projects. Here are some examples: ISTE 2d - Contribute to project teams to produce original works or solve problems. AASL 3.2.3 - Demonstrate teamwork by working productively with others. ISTE 2a - Interact, collaborate, and publish with peers, experts, or others employing a variety of digital environments and media. AASL 3.1.2 - Participate and collaborate as members of a social and intellectual network of learners. The two standards differ though in that AASL 3 focuses heavily on the use of technology and information from an ethical standpoint. ISTE 2 standard does not mention this aspect in any format. ISTE 2 differs in that it has a focus on a global education. Ethics: AASL 3.1.6 - Use information and technology ethically and responsibly. AASL 3.3.7 - Respect the principles of intellectual freedom. Global: ISTE 2c - Develop cultural understanding and global awareness by engaging with learners of other cultures. This was just a quick analysis of a small portion of the ISTE standards and the AASL standards. As you can see the standards are very similar. Where they differ though allows for the two sets of standards to work together and enhance each other. Hopefully this brief analysis is enough to convince you to incorporate both sets of standards into your lessons! New Post: So as you can probably see, those two sets of standards (AASL and ISTE Standards for Students) really do compliment each other. Now I have to compare the AASL standards to the ISTE Standards for Teachers. 1) Facilitate and inspire student learning and creativity (ISTE) 1) Inquire, Think Critically, and Gain Knowledge (AASL) 2) Design and develop digital age learning experiences and assessments (ISTE) 2) Draw Conclusions, Make Informed Decisions, Apply Knowledge to New Situations, and Create New Knowledge (AASL) 3) Model digital age work and learning (ISTE) 3) Share Knowledge and Participate Ethically and Productively as Members of our Democratic Society (AASL) 4) Pursue Personal and Aesthetic Growth (AASL) Do you see anyway to compare these two sets of standards? I don’t. Now I am not saying these are not of extreme value to us as educators in a technology-driven field. In fact, it really goes to point out that AASL should create a similar set of standards for the librarian. Here are just a few of the ISTE Standards for Teachers that would be very useful to us and have nothing to compare to in the AASL standards. ISTE 1b - Engage students in exploring real-world issues and solving authentic problems using digital tools and resources. ISTE 1c - Promote student reflection using collaborative tools to reveal and clarify students’ conceptual understanding and thinking, planning, and creative processes. ISTE 2c- Customize and personalize learning activities to address students’ diverse learning styles, working strategies, and abilities using digital tools and resources. ISTE 3b - Collaborate with students, peers, parents, and community members using digital tools and resources to support student success and innovation. These four examples offer proof to why we should incorporate ISTE standards into our libraries. We need these to support and guide us as we become technology-driven libraries. It will be interesting to see how the new AASL standards compare to the ISTE standards both the ones for students and the ones for teachers. 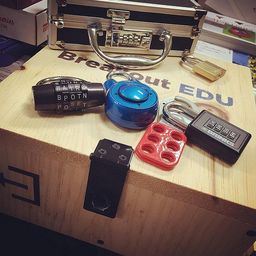
I thought I would take the time to tell you about a new favorite of mine. It is not technology based. In fact, it utilizes a box with lots of locks on it. However, it is not the box that makes this awesome. It is what you add to it that makes it so cool. It is called Breakout EDU (http://www.breakoutedu.com/). Breakout EDU is similar to the hot trend of escape rooms. Educators create a lesson around any topic you can imagine. (The only limits are your own creativity!) Then you put students on a type of scavenger hunt where they use clues to try and solve different types of locks (word, number, directional, color, etc). The goal is to solve all of the problems and open the last box before the timer runs out. If you want to make it really awesome...add a candy treat to the last box! (Who doesn't love candy!!!)
In the following YouTube video, one of the Breakout EDU founders explains the concept behind Breakout EDU. He mentions on one the slides that by using Breakout EDU in the classroom, we are providing students with the opportunity for Critical Thinking, Collaboration and Creativity which should all be vital elements of our library lessons. Here is a YouTube video showing an elementary class trying to Breakout for the first time.
Articles about Breakout EDU:
- http://www.fractuslearning.com/2015/11/03/breakout-edu-you-had-me/ - https://engagetheirminds.com/2016/01/06/breakoutedu/ - http://www.mightylittlelibrarian.com/?p=1357 - https://dougfrankish.wordpress.com/2016/01/12/breakout-of-traditional-education-with-breakout-edu/ Purchase: There are currently two versions of the Breakout boxes. The original wooden box costs $119 and the newer plastic version is $89. Instructions are available on the website on how to build a similar box using resources found on Amazon or at a local hardware store. *Personal Advice: I would consider buying more than one Breakout box if you have the money or at least buying other types of boxes that you can lock. If you try to run a Breakout with small groups, it is hard to run things smoothly with only one box. Students do not like to wait! New Feature: This summer, Breakout EDU launched a LOCKS app. This app allows you to create almost any type of lock you can imagine on your iPad or other device. The iPad would then be placed inside one of your Breakout EDU boxes for students to find and unlock. Here is the video explaining how the app works!
Additional Resource:
There is a wonderful Breakout EDU community on Facebook at https://www.facebook.com/groups/breakoutedu/. Educators around the globe are constantly sharing ideas, lessons, and findings. This is a great resources to get ideas for your own Breakouts! Breakout EDU is all about being creative and collaborating with others, whether you are the person trying to breakout of the box or the person trying to create lesson! Breakout is a great platform to teach all of our library skills to our students and even possibly some of our teachers. I hope you like this. It is truly an amazing concept and students really do love it! 
As I was scrolling through Facebook posts today, I happened to see an ad for this app called Recap. It looked interesting so I clicked on it. Boy... am I glad I did! This is one of the most interesting web 2.0 tools I have seen and I know the teachers at my school and their students are going to love it.
So Recap (http://letsrecap.com) is a tool that allows the teacher to pose a question to his/her students in either text or video format. Students then respond to the question by recording a short video on their chromebook, macbook, or iPad (no Andoid app yet!). The teacher can then use these videos to judge how well students understand the content. The videos can be shown to the class one at a time or in a special video montage that the app creates automatically. Recap is completely free! Students can either have an account set up for them with email and password or the teacher can share a code that students use to access the questions. Sign up is super easy and quick. Below is a screenshot of what it looks like from the teacher's perspective when a question has been answered. 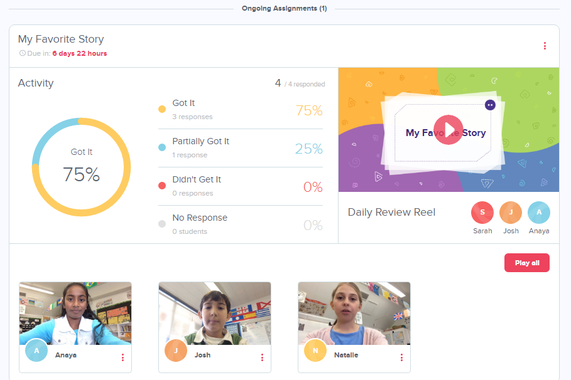
You will notice that students can also assess how comfortable they are with their answer to each question (Located in the top left corner of the screenshote). This is a quick way for teachers to see how comfortable students are with the content without embarassing any of the students.Teachers can also quickly see who has not completed an assigned question.
Check out this YouTube video to see the app in action! This app is pretty new, in fact it is still in beta testing, so I was unable to find a whole lot of additional information to share with everyone. However here is what I was able to find for you. - Blog post from Innovate, Instruct and Inspire: http://innovateinstructinspire.blogspot.com/2016/04/lets-recap.html - Press Release from PR Web: http://www.prweb.com/releases/2016/02/prweb13196434.htm - Teacher Resources from Let's Recap site: http://letsrecap.com/what-teachers-are-saying/ So how can we possibly use this app? - Assessments (You can ask up to 10 questions at a time) - Entrance/Exit Slips - Homework Assignments - Getting to Know You project at the beginning of the year - Book Reports - Quick Reviews - Surveys These are just a few ideas. I would love to hear yours! Please share in the comments.  If you plan on working in an elementary school, then you must go and check out Mrs. Lodge's Library Blog (http://www.mrs-lodges-library.com/blog/). This site has been around for years and there are times when it is not updated as much as one might like. But it is an awesome place to for new librarians to get ideas. She offers ideas on how to run your library more smoothly. She has created this awesome game for students called Shelver! which allows students to practice their shelving skills. The best thing about her site/blog is that she has created tons of library centers that you can use in your library. I cannot tell you how many of her ideas I have tried in my own library. Some work, some don't. But it is the best place out there for ideas to try in the elementary library.
As I was looking for blogs to share for our class, I happened to look at her site and realized she had made several news posts. Here latest post in particular is of interest to me so I thought I would share it with you. It's about Makerspaces! http://www.mrs-lodges-library.com/2016/06/engineering-center-maker-gallery-2/#.V1nOIdIrJdg In this blog post, she has created a special place in her library to showcase the work of her students. She calls it her "Maker Gallery". Here students can display the things they created using one of her makerspaces. Student names are written on special little cards that are displayed with the items they made. She says in the post that other students love looking at the display and seeing who is featured. The display also shows teachers and administration what is going on in the library. I really love this idea. I started dabbling in makerspaces this past year in my library. I remember one particular instances when a group of fourth graders worked together to create a house out of legos. They put so many details into this house that I did not have the heart to take it apart. They asked me to take a picture of it for them, which of course I did. But I also decided to leave it out for others to see. Now this house was not put out on a fancy display table, but when other students found it they were always impressed and wanted to know who had created it. I wish now that I had displayed the house better. That is why I am sharing this blog post with you. I truly think the idea of having a special gallery to display student creations in the library is a marvelous idea and will only increase student interest in the library. If you don't have room for a special gallery, I think another option would be to take photos of the creations and display them on a TV or smartboard in the library in a rotating slideshow. This way you would not be holding up your legos so that other students can use the pieces as well. Hmm...now I may just have to go and buy that flat screen TV the students have been asking for! 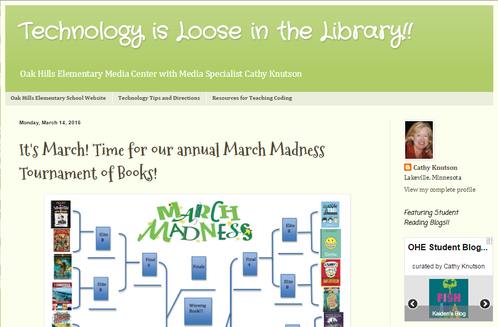 First let me start off by sharing some information with you about this really cool blog I found. As you can see from the title of this post it is called “Technology is Loose in the Library” and the blog is written by Cathy Knuston who is the media specialist at Oak Hills Elementary. You can locate her blog at http://ohekidstech.blogspot.com/.
What she is doing in her library is truly amazing. She is very focused on using technology to highlight and enhance what the learning goals are for her students. She posts vibrant pictures of her students in action in the library and she goes into great detail explain how the different technologies are incorporated. This is an excellent resource for media specialists who want to integrate more technology into their lessons, plus it is just a great place to get lesson ideas. Now on to the main topic of this post, Genrification! Have you heard of this yet? If not, you may have been living under a rock for awhile. This is becoming more and more popular with each passing day in school libraries. Genrification is a system of organizing the library by genres instead of by the Dewey Decimal System. This means that instead of having alphabetical shelves of fiction books, you would have alphabetical Fantasy Fiction, Sports Fiction, Historical Fiction, Mystery Fiction, and many other genres. This could also mean, if you really get into it, throwing Dewey out completely and organizing your entire collection by genre and mixing fiction with nonfiction books. This would mean that in the basketball section you would have fiction books about basketball, nonfiction books about basketball and potentially biographies about famous basketball players. Are you intrigued or worried or scared about the prospects of genrification? Here are some blog post by some media specialists who have undertaken this project. The first one is the author of this blog Cathy Knuston. http://ohekidstech.blogspot.com/2015/05/hacking-genrification-oak-hills.html - So this post was written on May 26, 2015 which means she undertook this project last summer. She only genrified her fiction section of 4,000 books and based on the pictures she had plenty of help. She bought genre labels from DEMCO to label the books. The post explains the entire process and of course shows pictures of the different steps. She even includes a discussion on how she changes the records in the Destiny catalog. http://learninprogress.blogspot.com/2014/07/project-genre-fy-fiction-section.html - So this post was written on July 30, 2014. This is great article on genrifying the library includes information on how genres were picked and lots of detailed information on how to change the catalog records. It even has video instructions which I find the most useful since I am a visual learner! https://christyminton.wordpress.com/2014/05/04/genrefying-a-high-school-library-a-detailed-planning-document/ - This post was written on May 4, 2014. This focuses on a high school that undertook the genrification project for their library. I included this post because of the detail that went into writing this post. It is a great resource for anyone undertaking this project. https://expectmiraculous.com/2016/05/25/starting-the-genrefication-process-ditching-dewey/ - This last post is from one of the elementary media centers that was included for our SLM Analysis project. The post was written on May 25, 2016. The post does not have as many details as some of the others, but the pictures included are really great and I thought it would be nice to include someone local who has chosen to undertake this project. Now I would like to tell you where I am at with all of this. I feel like this is something I might need to do, but I am unsure as to what level I should take it to. I have bought the DEMCO genre stickers and I have started creating my lists in Destiny. My original thought was to keep everything in Dewey order and just label the books by genre. Students would then be trained to look for the sticker they are most interested in. It would definitely help with the shelving of the books if they stay in ABC order. But now after looking at these blog posts, I wonder if it will benefit the students much at all? It would definitely make things easier for the students if the books were grouped together by genre. But my next thought is does this hurt them down the road? I am pretty sure that the middle and high media centers in my area are not organized in this manner. So what do you think? Is this the future of media centers everywhere? Do you think this would help or hurt our students? I would greatly appreciate your input on the matter!  I have been trying to get a head start on our Website Analysis assignment and as I was looking through one of the elementary sites something caught my eye. The name of the website is Bookopolis (https://www.bookopolis.com/). I had never heard of it, but it looked really interesting. As I started looking at the website, I discovered that it was one of AASL's Best Websites for 2015 under the social networking heading. Even better, right?!
What is Bookopolis you ask? Well it plain words it is the kid version of Good Reads. Students create lists of books that they have read, want to read, or are currently reading. They can then write book recommendations and book reports for these books. They can also maintain a reading log on the website. Students earn points and badges for everything they do on Bookopolis. The social aspect of the website comes from the ability for students to see what their friends are reading and to be able to send them book recommendations. So this Web 2.0 tool is amazing for students, but it is even better for educators. Media specialists and teachers create a free educator account for themselves and then accounts for each of their students into different groups. As librarians, this means we can either group student accounts by homeroom, grade-level, or even by book club. Additional teachers can by then be added to these classes or groups which adds the collaboration element between the classroom teachers and the media specialist. In addition, as the teacher of the group, we can run reports to gather information such as total minutes read, total pages read, total books read, and most popular books. Teachers can also read and give feedback on reviews and book reports. Teachers could use these reviews and reports for a grade. To gain a better understanding of Bookopolis and how it works, I went to http://www.ala.org/aasl/ecollab/bookopolis and watched a 50 minute webinar that was created by the founder of the site, Kari Riedel. The following is some information about Bookopolis that I learned from the webinar. - Bookopolis is designed for 2nd – 8th grade students - All reviews are monitored by the site for bad language and personal information (It is COPPA Complaint) - You can integrate Bookopolis with Google Classroom and Edmodo accounts - It only has books designed for kids and young adults (no adult books) - It provides opportunities for Digital Citizenship lessons and discussions - There is an interactive tool on the site called Book Quest which helps students find new books to read - Everything is written in kid-friendly language - Parent accounts are available so they can see what their child is doing on the site - Bookopolis provides opportunities for students to practice opinion writing through Book Reviews - Bookopolis provides opportunities for students to practice comprehension and critical thinking through Book Reports - There is a Bookopolis App available in the Apple Store and there is a Google Chrome App I am so excited about this new tool and what it might mean to my students and teachers. I cannot wait to get started using this with them. I hope you learned something new today. To learn more about Bookopolis, you can check out one of the many tutorials that the website offers.
I want to tell you about my all time favorite web 2.0 tool that I use all the time. It is called Animoto (https://animoto.com).
This online creation software incorporates photos, songs, text and videos clips to create one of a kind custom videos in a snap. It is so simple to use that even a child can use it. The best part about Animoto is that teachers can apply for a free education account! Here is an introductory video from Animoto's YouTube page.
One of my jobs as the media specialist at my school is to take photos and publicize what we do throughout the year on our school website and on Facebook. Animoto has been a lifesaver for me because I can upload photos and have a three minute video about field day or the fifth grade dance within a matter of minutes. And the best part of it is that the students love watching the videos! They enjoying looking for pictures of themselves and of their friends.
Here is a sample of my own work from this past year.
Now to be fair I have only used Animoto to create videos about events, but this software would be great to create introductory lesson videos or even for students to use to create class projects. Animoto does allows teachers to create free accounts for their students to use. Students can then work on their own or in groups to create a video about whatever topic they want. The blog at Freemake.com has a great article about Animoto educator accounts. You can read it at http://www.freemake.com/blog/animoto-education-for-school-users/. In the article, it describes in detail how to apply for and set up an education account.
I think Animoto is one of the best tools out there for media specialists and educators. If you have not already tried it, please do so. You will be happy you did! For more information about an Animoto education account and to check out a few more sample videos, go to https://animoto.com/education/classroom.
|
Past Posts
August 2018
Categories |


 RSS Feed
